Friday, July 29, 2011

SURPRISINGLY GOOD CARROT SOUP

<
RECIPES THAT WOULD MAKE YOUR MOTHER PROUD OF YOU BECAUSE YOU’RE GOING THE EXTRA MILE AND STARTING FROM SCRATCH

Okay, so maybe you like carrot soup and maybe you wish that whoever invented it had never gotten up in the morning that day, but whatever your feelings might be about it, it's one of those 'good for you' things that your mother probably never gave up trying to get you to eat. Granted, it's not as good as a Big Mac or a serving of lasagna, but it will get make you feel good all over knowing you've made something that uses up the broth you had left over from the chicken you cooked for the salad sandwiches and, in fact, it might even make a complete meal if you decide to serve it along with the sandwiches, which is not a bad idea. Here is the secret recipe which really isn't a secret at all.

2-3 lbs. carrots. (Yes, you can use the baby carrots in the bag, but then it wouldn't be from scratch, would it?)
1 gallon water for cooking the carrots
2 small onions
2 T. butter
1 T. ginger juice
1 C. heavy cream
2 t. coriander
2 t. salt
6 C. chicken broth
1/4 C. sour cream
parsley as a garnish

1. Peel and cut up the carrots. Place them in a large pot and cover with water. Cook until they are soft enough to put a fork through.
2. In the meantime, peel and grate the ginger. Take the grated ginger and squeeze out the juice into a small bowl. Set aside.
3. Cut up the onion and cook it in the butter in another pot until it is tender. Add the chicken broth, the cooked carrots, the salt, ginger juice and coriander to the onion and heat through.
4. Place the carrot mixture into a blender in small batches and blend until creamy.
5. Serve while still hot with a dollop of sour cream and a sprinkling of parsley. Makes 4-5 servings. Enjoy!


Here are the carrots after they have boiled for approximately 45 minutes.

Here are the onions ready for the other ingredients to be added.

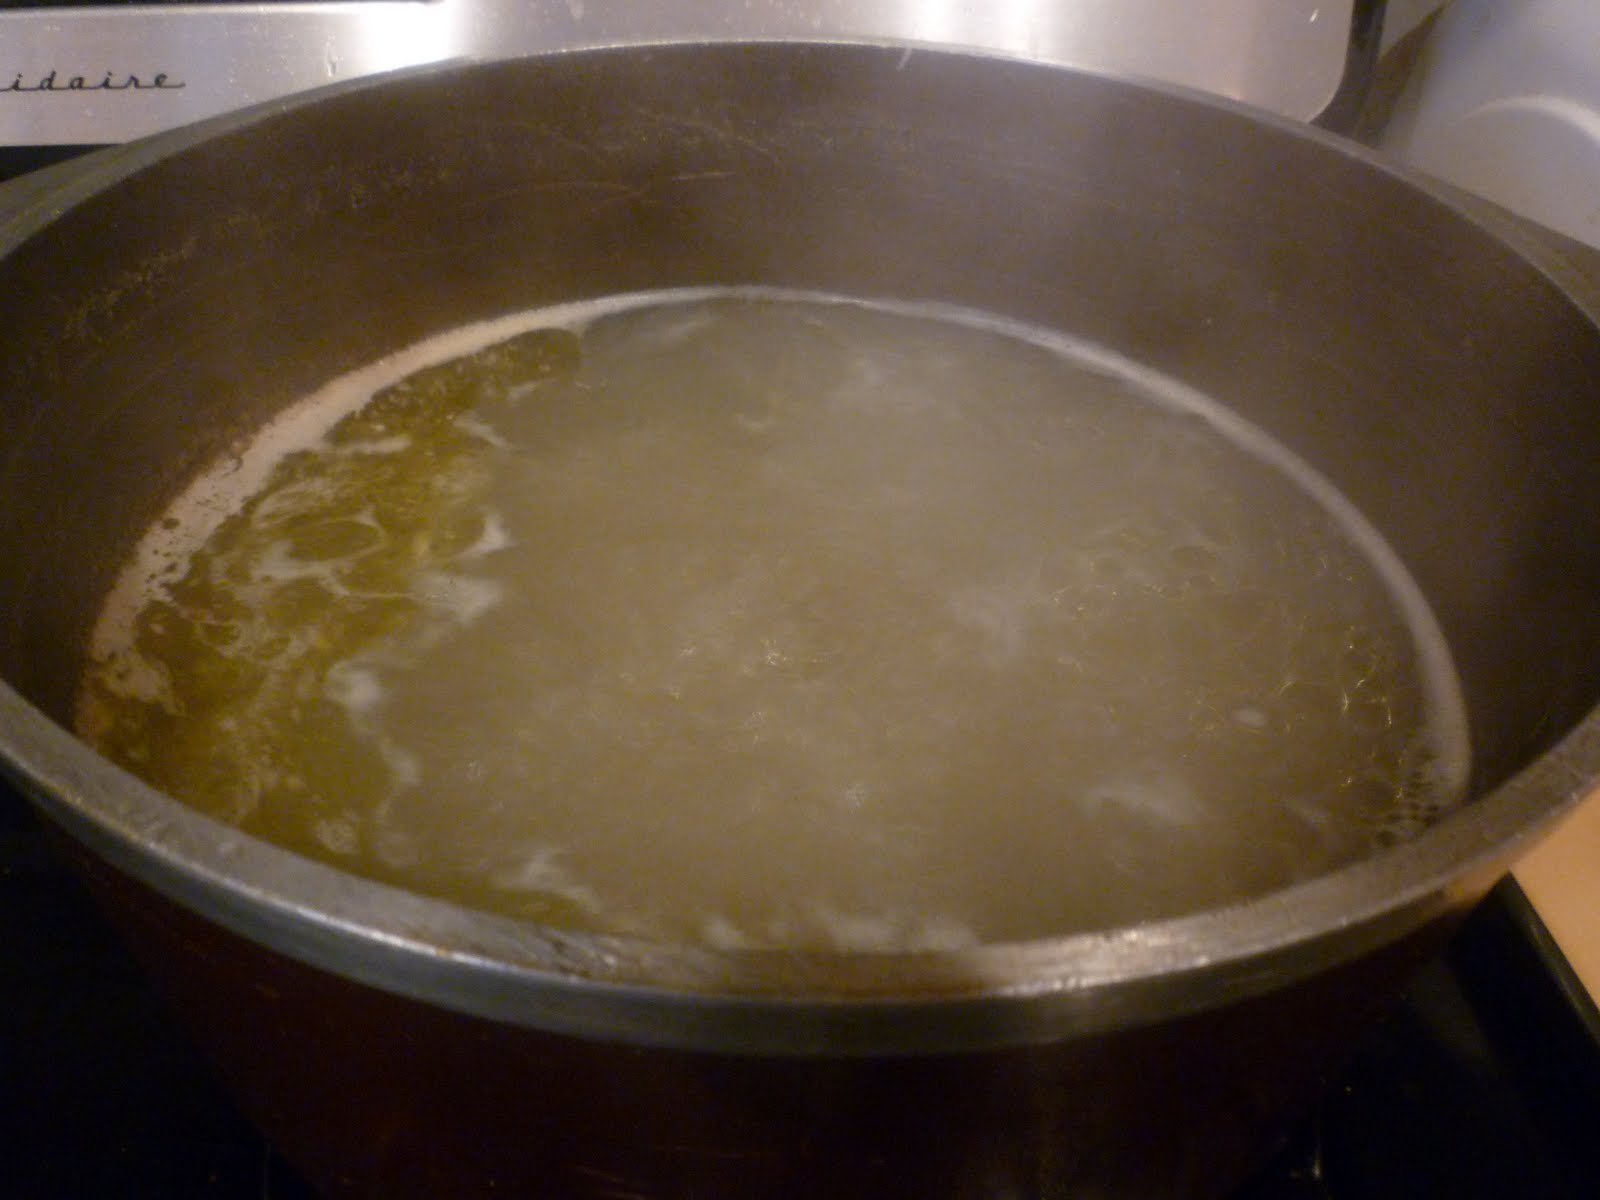
Here is the broth reserved from yesterday's chicken that was cooked for the sandwiches. Notice the fat on the top that is easy to skim off when it has been refrigerated overnight.

Thank goodness for blenders that make it so easy to make a creamy, delicious soup.

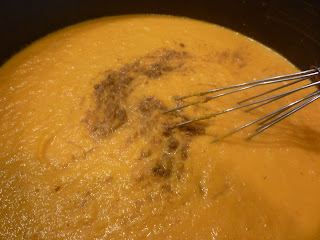
Here is the soup with the coriander and salt being added.
It's easy and it's definitely 'from scratch'!

Thursday, July 28, 2011

CHICKEN SALAD SANDWICHES

RECIPES THAT WOULD MAKE YOUR MOTHER PROUD OF YOU BECAUSE YOU’RE GOING THE EXTRA MILE AND STARTING FROM SCRATH

Now we're really getting down to basics. I think almost everyone likes a good chicken salad sandwich, but here you have 'the real thing' which means starting with a real chicken and not just canned chicken or frozen chicken or the kind of chicken that comes all cut up in little packages from the meat department of the grocery store. At least you don't have to go out and catch this chicken and bring about its demise and then clean it out and pluck all the feathers from it. Gratefully, that part is all done for you but still it's a chicken, the whole thing and not just a few parts here and there. After that, it's all easy peasy with just a few ingredients but delicious taste and it makes quite a lot so you'll be able to make LOTS of chicken sandwiches. Actually, you can do quite a few things with chicken salad like:
  • Stuff a scooped out tomato
  • Place it on top of a halved avacado
  • Make an open-face sandwich
  • Fill a toasted pita pocket
  • Add sliced mango and toasted almonds
  • Add chopped apples and curry powder
  • Add fresh tarragon and minced red onion
  • Add diced red bell peppers and chopped scallions
  • Add peas and crumbled bacon
  • Put on top of a toasted English muffin and cover with cheese; then broil until bubbly.
However, here we're just making simple chicken salad sandwiches which is my favorite way to eat it. So,
here is how you do it:

1 3-4 lb. chicken
1 gallon of water in a large pot or enough to cover the chicken.

1. Put the chicken in the pot, cover it with water and bring it to a boil.
2. Cover the pot with a lid, lower the heat and simmer for one hour.
3. Remove the chicken, allow it to cool, take away all the skin and bones
4. Cut up the chicken into small pieces. Then add:

2 C. finely sliced celery (I use a food processor)
1 small onion also thinly sliced (optional)
2 C. mayonnaise

1. Mix well together, then chill overnight until ready to use.

Here is the chicken:
In the pot, ready to be cooked.

Cover the pot to bring to a boil.

Here is the chicken completely cooked.

Here is the chicken without the bones and skin.

The chicken now completely diced into small pieces.

Shredding the celery and onion into a small bowl with a food processor.

Ready for the mayonnaise

Ready to eat or to be chilled which I think tastes much better.

After the chicken has been removed from the pan, continue boiling the water which is now broth until it has been reduced by half. After it has cooled in the pan, pour the broth into a quart jar(s)
and refrigerate it so the fat will rise to the top and can easily be removed. This will be used in tomorrow's recipe for carrot soup.

I do like to eat my chicken sandwiches on homemade rolls and so if you feel up to it and really want to do the 'from scratch' thing, here is the recipe and how I make them. Otherwise, just pick up some fresh rolls from the bakery which will be every bit as good.
First, I do use a bread maker when I'm making a small batch but only to knead the dough and rise once. This is the recipe I use:
1 1/2 C. warm water
1/2 C. dry milk
1 tsp. salt
1/4 C. sugar
2 T. oil
4 C. good quality flour
2 1/2 tsp. yeast

The thing I like about a bread mixer is that you can put all the ingredients into it at night, set it on the dough setting and then let it sit overnight and push the 'start' button in the morning when I get up so it can be kneading and raising while I'm getting breakfast ready. This is just to save time.

After it's ready to take out of the bread maker, I put it on a clean, floured surface and roll it into a big ball, cut it in half, then roll the smaller balls into a big circle.

I cut each circle into eight even pie-shaped pieces, roll them up and put them on a greased or sprayed cookie sheet and allow the rolls to raise for approximately one hour.

Once they are big enough, I bake them in a 350 degree oven for about 20-25 minutes or until they are brown on both the top and bottom.


This is what they should look like. Allow them to cool before filling with the chicken salad. This recipe makes 16 good-size rolls. Enjoy!

Wednesday, July 27, 2011

UNCOMMON RAMEN STIR-FRY


RECIPES THAT WOULD MAKE YOUR MOTHER PROUD OF YOU BECAUSE YOU’RE GOING THE EXTRA MILE AND STARTING FROM SCRATCH

Everyone knows about Ramen soup, the staple for starving students and anyone who wants a quick lunch without much fuss and even less nutrition, but if you do it right, you can turn Ramen into a delicious meal that is not only inexpensive (okay then, cheap) but packed with lots of nutritious veggies and very light on the meat, just enough for some protein. It's something you can do when you don't have a lot of time but you still want to put something together that's more than just a bowl of soup that will satisfy a hungry eater and make you look like you're doing something exceptionally marvelous when all it is is a few packages of Ramen with a few other things thrown in. There is a trick to serving Ramen as a meal and having it come across as more than what it is--a quick way to put something on the table without spending an arm and a leg or slaving on it for hours and hours. One is to make sure you set the table with nice dishes and cloth napkins and the second is to serve it in a nice serving dish, and not just dish it up on the plates straight out of the pan. This gives the impression that you have something really special coming up, which of course you do, but it's not quite on the level of Chicken Cordon Bleu. Be that as it may, it's good and it's hot and it's fun and easy to make and it would make your Mom proud that you're doing something more than just making a pot of Ramen soup, so here's how you do it:

1 T. grated fresh ginger
1 C. chopped cooked meat (can be ham, chicken, beef or whatever you might have on hand but it needs to be pre-cooked)
1 small onion
1 small bell pepper, any color
1 small zucchini
1 C. matchstick carrots
1 C. mushrooms
2 C. broccoli florettes
4 stalks celery
2 T. EVOO (Extra Virgin Olive Oil)
2 packages Ramen soup, crumbled into small pieces
2 C. water
2 packets of seasoning from the soup
2 T. corn starch
1/2 C. low sodium soy sauce
1 C. sliced cashews

1. Cut off a piece of ginger, peel it and then grate it on the largest side of your cheese grater. Set aside. Don't skip the ginger as it is an important part of the recipe. It gives the stir-fry wonderful flavor that you won't get otherwise.
2. Chop all of the veggies in thin slices except the carrots that are already cut up for you.
3. Heat the oil until very hot in a large skillet. Add the veggies and ginger. Cook, stirring constantly with a wooden spoon or paddle, until the onions are translucent.
4. Add the crumbled Ramen noodles and stir until they turn light brown.
5. Add the cooked meat. Keep stirring.
6 Combine the water, seasoning packets, corn starch and soy sauce in a large measuring cup. Add to the veggies. Stir well.
7. Cover the pan, lower the heat to medium low and steam until noodles are cooked. This takes about 5-7 minutes. Don't overcook or the noodles will become mushy.
8. Serve hot with cashews sprinkled over the top. Serves 2-3.


Tuesday, July 26, 2011

FETA PASTA WITH BROCCOLI

RECIPES THAT WOULD MAKE YOUR MOTHER PROUD OF YOU BECAUSE YOU’RE GOING THE EXTRA MILE AND STARTING FROM SCRATCH

Sometimes you just need to get back to the basics and feel like you're doing the 'real thing' by cooking something that doesn't use a mix or a can or a box or anything except what you have on hand and can put together to create something amazing and wonderful all by yourself. It's both humbling and exhilarating and, the best thing about it is that YOU CAN DO IT! So here is one of those recipes that will qualify you for the 'Starting From Scratch' Hall of Fame or at least, make you feel like you're ready to be added to the list. In addition, it's easy and fun, so stand back and watch yourself make something that not only would make your mother proud of you but make you proud of yourself, as well. Here's the recipe:

2 C. uncooked pasta (I used Penne pasta for this recipe, but you could use about anything except Manicotti noodles)
1 tsp. salt
2 Qt. water (for cooking the pasta)
2 C. fresh or frozen broccoli florettes
1 C. cream (not half and half)
1 C. Feta cheese
1/2 C. Parmesan cheese
1-2 tsp. garlic powder (according to your taste)
1 tsp. salt

1. Cook the pasta noodles until they are soft or al dente, whichever you prefer. Drain the pasta well and set aside.
2. Steam the broccoli but not too much. It should still be bright green but not hard. Drain and set aside.
3. Combine the cream
and cheeses, the garlic powder and salt reserving some of the Parmesan cheese to sprinkle on top.
4. Combine the cream and cheeses, reserving some of the Parmesan cheese to sprinkle on top.
5. Add the noodles to the sauce and then carefully stir in the broccoli so it doesn't fall apart.
6. Serve immediately while it is piping hot. That's it. What could be easier than that? Enjoy!
Serves 2-3.


Friday, July 22, 2011

CHOCOLATE CHIP SPONGE CAKES

RECIPES FOR PUTTING ON A GRAND SHOW AND MAKING A GREAT IMPRESSION ON VERY IMPORTANT PEOPLE

I found this recipe in a children's cook book called "The Children's Step-By-Step Cook Book - Photographic cooking lessons for young chefs" by Angela Wilkes. I made a few changes in the recipe, something I can't seem to help doing whenever I discover a new recipe that I really like and want to try. The original recipe suggests making the cakes either orange, lemon or chocolate but I decided to make mine plain and add chocolate chips instead. As you can see, it is a versatile recipe and is open for all sorts of experimentation and fun. The original recipe also had you making the cake in two layers and frosting it just like a regular cake but, as you can see, mine is not quite like that. Ah well, I just can't seem to color in the lines when it comes to cooking. However, I liked the way the recipe turned out and think I'll be using it often. It was easy to make and didn't require anything special--just a mixing bowl and a wooden spoon. I'll admit my baking pan is a little special, but I'll explain that later on. Here is the recipe:

2 C. self-rising flour
1 C. sugar + 2 T.
4 eggs
1/4 C. butter
1/4 C. shortening
2 teas. baking powder
1 teas. salt
1 teas. vanilla
1/2 C. chocolate chips
1/4 C. powdered sugar
Optional:
For lemon cake: 1 T. lemon juice and grated zest of 1 lemon
For orange cake: 1 T. orange juice and grated zest of 1 orange
For chocolate cake: 1/4 C. cocoa powder

1. Soften the butter in a small bowl in the microwave and add the shortening

2. Add all the other ingredients except chocolate chips and powdered sugar to a medium-size mixing bowl. Stir with a wooden spoon until well-blended.

3. You should be able to drop the batter from the spoon easily. If it is too thick, thin it down with 1 T. of water.

4. Prepare the pan you want to use for the batter. My favorite one is this cute cake pan I bought at a specialty store in Boise, Idaho called "The Co-Op". Once I saw it, I couldn't be happy until I had bought it. It is made by Nordic Ware and is so much fun to use. The trick is to spray it well with Baker's Joy or Pam Baking spray so the cakes pop out easily. It makes wonderful little cakes that are so fancy you'll feel like a professional baker.

5. Fill each cup 2/3 full.

6. Sprinkle 1-2 T. chocolate chips on each cup and stir them into the batter.

7. Here is how they look with the chocolate chips added.

8. Bake 35 minutes in a 325 degree oven.

9. Sprinkle with powdered sugar and voila! Aren't they adorable? Enjoy!


Thursday, July 21, 2011

MOLOKAI SHRIMP AND RICE WITH STIR-FRY

RECIPES FOR PUTTING ON A GRAND SHOW AND MAKING A GREAT IMPRESSION ON VERY IMPORTANT PEOPLE

I wanted to include this recipe because it is another delicious meal I had while I was in Hawaii with the Vogts. Everything they had was so amazingly delicious and healthy, but this one was really a stand-out. Lynn began by taking some shrimp from a bag of frozen shrimp she bought at Costco, probably about 2-3 cups in all, and placing them in a Zip-lock bag and then pouring a small bottle of Italian salad dressing into the bag to marinate the shrimp. This she did about 5-6 hours prior to the time the meal was planned. Along with the shrimp, she made a pot of rice and a pan of wonderful stir-fried vegetables to go with the shrimp. It was all amazing and as I watched her, I realized easy a meal like this can be. It doesn't take a lot of time or money to put together a meal that is not only delicious but healthy, to boot. This one is a prime example.

2-3 C. frozen shrimp
1 8 oz. bottle Italian salad dressing
Fresh vegetables for stir-fry:
1 Italian eggplant
2 carrots
1 C. snow peas
1 medium onion
1 stalk celery
1 bell pepper
2 small zucchini
1 C. fresh spinach
2 T. olive oil for frying vegetables
Sauce:
2 C. chicken broth
1 can coconut milk
1 t. Thai red curry sauce
Rice:
1 C. brown rice
2 C. water
1 tsp. salt


1. Cook the shrimp on the bar-b-que about 5 minutes on each side

2. Heat a plate on top of the bar-b-que until it is too hot to touch to put the shrimp on.

3. Make sure the shrimp are completely cooked, but not overdone.

4. Prepare the rice and set aside.

5. Assemble all of the ingredients for the stir-fry sauce and mix in a separate saucepan.


6. Chop the vegetables up and prepare them for frying.


8. Stir-fry gently in olive oil stirring constantly until they are completely cooked but not mushy.
Add the sauce to the vegetables and serve over the rice. Serve the shrimp on the side with dipping sauces as desired. They used a shrimp cocktail sauce and thousand island dressing. Enjoy!