Wednesday, August 31, 2011

PUERTO RICAN PORK ROAST

RECIPES THAT MAKE YOU FEEL LIKE GOD IS IN HIS HEAVEN AND ALL IS RIGHT WITH THE WORLD.

The nice thing about this recipe is that you don't have to go all the way to Puerto Rico to enjoy the wonderful taste of this extremely delicious pork roast. It might seem like a lot of trouble and bother to remember to make the marinade the night before and put the roast into the Zip-Lock bag with the marinade and put it in the refrigerator overnight before you cook it the next day, but trust me, it is worth it! Before I discovered this recipe, I had never even thought about marinating a pork roast. I thought the only thing you ever marinated was chicken or shrimp, but was I ever wrong. This is absolutely the best roast pork I have ever eaten, bar none. Life doesn't get much better than this. It makes enough to serve a fair-sized group of 4-6 and it can even stretch for two meals if you want to use the meat to make tacos with the next day.

Here is the recipe:

One pork roast, 2-4 pounds depending on how many you want to serve

Marinade:

5 or more cloves of garlic, peeled

One onion, quartered

Two tbsp. dried oregano

One tbsp. ground cumin

One teasp. chili powder

One tbsp. salt

Two teasp. black pepper

One tbsp. olive oil

One tbsp. wine vinegar

One lime, juiced

¼ C. orange juice

1. 1. Combine the marinade ingredients in a blender or food processor and blend.

2. 2. Score the meat with a cross-hatched pattern and marinate in the mixture overnight in the refrigerator.

3. 3. The next day put the meat into a crock pot and cook on high for 4-5 hours or on low for 7-8 hours.

4. 4. Remove the meat and place into a serving bowl. Shred and pour the juice from the crock pot over the meat.

5. 5. Serve over Lime Cilantro rice (recipe below) and then prepare like a taco with shredded lettuce, tomatoes, cheese, black beans, avocado, onion, etc. Serves 4-6.

I know this looks gross, but this is the pork roast in the marinade ready to go into the refrigerator for the night.

Here is the pork roast ready to go into the crock pot. Just lift it out of the bag and then throw the bag away with the marinade. It's not safe to use it to cook the meat in which is a shame because it has all those good juices in it. Oh, well.

After the meat has cooked long enough and about an hour before you are ready to eat, put 1 quart of water into your rice cooker along with 2 cups of rice and 1 tsp. salt. Then chop up 1/2 bunch of cilantro and juice two limes. Set the cilantro and lime juice aside to use after the rice has cooked. Once it has steamed and you fluff it up, add the chopped cilantro and the lime juice to the rice. Stir well.
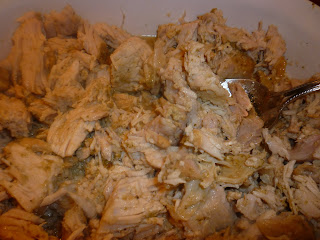
When you take the roast out of the crock pot, shred it into small pieces. Then pour the juice left in the crock pot over the meat.

Prepare the toppings you want to have over the meat and rice. I used lettuce, black beans, tomatoes and green onions and shredded cheese. Then build your dinner putting the rice on the bottom, then the meat, then the toppings. Add a dollop of sour cream on the top. Enjoy!


Tuesday, August 30, 2011

CHEESE FONDUE DINNER

RECIPES THAT MAKE YOU FEEL LIKE GOD IS IN HIS HEAVEN AND ALL IS RIGHT WITH THE WORLD.

First let me say that you don't need to have a fondue pot to make this dinner. Having one, especially an electric one that keeps the cheese sauce warm and bubbling, is nice but not necessary. You can use a chaffing dish or just a plain heavy casserole and have just as good a result. The main reason to use a fondue pot is because it the Swiss originally invented the fondue sauce and this is how they did it, but their way was to make a sauce using Emmental, Gruyere or Swiss cheese or all three and wine and chunks of crusty bread for dipping. I have modified their recipe somewhat and made it a little more family-friendly and something everyone can eat and enjoy. Also, it might seem like it's a lot of work but it really isn't. The thing that simplifies it the most is the meatballs which are the frozen kind you can buy at most supermarkets. You can go ahead and make homemade meatballs if you want to, but having a bag of frozen ones in your freezer is so handy and they are so good that it seems almost masochistic to make them. The rest is just preparing the vegetables and keeping them warmed while you serve them and you have a great meal that is not only easy but unique and different, something your family and guests will remember for a long time to come. Of course, it would be perfect to finish off the meal with a nice chocolate fondue and fresh strawberries for dipping, but that would require two fondue pots which most people don't have. But you can borrow mine!

Here is how I did it:
2-3 pounds red potatoes
4-6 cups frozen meatballs, thawed and heated through
1 lb. bag mini carrots
3 C. broccoli florettes
1/2 head cauliflower broken into small pieces
2 small zucchini cut into slices
2 small yellow crookneck squash, sliced into chunks
1 lb. fresh mushrooms
1 recipe cheese fondue sauce (below)


1. Boil the potatoes until they are soft but not mushy. Cut into small chunks

2. Boil the carrots until they are soft. Drain and set aside.

3. Steam the broccoli and cauliflower until cooked with the broccoli still green and firm.

4. Steam the squashes and the mushrooms until they are no longer hard. Don't overcook.

5. Place the meatballs and the vegetables in warming trays and crockpots to keep them warm. Cover until you are ready to eat.

7. In the meantime make the cheese sauce. Here is the recipe:

1 qt. half and half
4 T. butter
1/4 C. flour
1 tsp. salt
1 C. grated Swiss cheese
1 C. grated Gruyere or Jarlsberg cheese
1/2 C. white cooking wine

1. Melt the butter in a large pan. Add the flour and cook, stirring constantly, until the butter is absorbed and it starts to change color.
2. Slowly add the half and half, stirring constantly until it is well mixed. Add the salt. Keep stirring over medium heat until it begins to thicken.
3. Add the cheese and white wine. Keep stirring until it becomes very thick.
4. Place in a blender and blend until smooth, being careful not to allow it to bubble over. It is very hot and can burn.
5. Put the cheese sauce in the fondue pot and keep the heat on low so it doesn't keep cooking but just stays warm.
6. Serve immediately. The trick is to keep everything warm so it's all ready at the same time.
The other trick is not to eat too much because it's so good! Enjoy.


Monday, August 29, 2011

BLT WITHOUT THE SANDWICH

RECIPES THAT GIVE YOU THE FEELING THAT GOD IS IN HIS HEAVEN AND ALL IS RIGHT WITH THE WORLD.

What could be simpler or easier than a summer salad made with tomatoes fresh from the garden and crisp green lettuce? If you love a good BLT, and I don't know anyone who doesn't, then this will be one of your favorite salads. Cooking the bacon isn't really that bad and yes, you do have to have bacon for this salad; otherwise it falls flat and doesn't accomplish the purpose for which it was intended which is to replace a good BLT in a healthier way but still give you the feeling you're eating one. Although the salad in itself is good, it's actually the dressing that sets it apart and gives it an out-of-this-world quality. I came across the idea for making this dressing quite by accident as I was looking up something quite different on the Internet and just happened to see this and decided to try it and the rest, as they say, is history--I was hooked! It has a superb tang to it and would probably be good on any salad, but it is exceptionally good on this one. So, let's get started and see if you don't agree that this is one of the best salads you've had in a long time:

1/2 head of Iceburg lettuce, washed and chopped
2 large fresh tomatoes
4 pieces of bacon, fried crisp and well drained then crumbled
1 ripe avacado, cut into slices
1/2 C. cheese for garnish
1 V & O salad dressing (below)

1. Prepare the lettuce and set aside. This salad is not made in a bowl but on the individual salad plates.
2. Wash and slice the tomatoes crosswise
3. Fry the bacon and after draining and crumbling, put in a small bowl.
4. Peel and slice the avacado.
5. Grate the cheese.
6. Pile the lettuce on the plates, the put the tomatoes on the lettuce, then the avocados, then sprinkle on the bacon and finish with the cheese.

Vinegar and Oil Salad Dressing:
In a blender, put the following:
1 C. canola oil
1/2 C. extra virgin olive oil
1/4 C. balsamic vinegar
1/4 C. white sherry vinegar (or you can use half white cooking wine and half salad vinegar)
1/4 C. soy sauce
1/2 tsp. Dijon mustard
2 cloves of garlic, peeled
1 green onion
1 tsp. grated fresh ginger

Blend well. It keeps in the refrigerator for at least a month.


To make it easier to remember, though, buy a small plastic bottle with a removable lid and write the ingredients and the proportions on the outside with a permanent marker, as below. This way when you run out, you'll have the bottle right there to tell you how to make it again and, trust me, you'll definitely want to make it again.


Friday, August 26, 2011

KILLER CHOCOLATE CAKE

RECIPES FOR WHEN THE LAST THING YOU WANT TO DO IS TO GO INTO THE KITCHEN AND COOK SOMETHING.

You may not feel like cooking, but when you make this cake wonderful cake, I can guarantee that you'll feel like eating! I discovered the secret of this double-rich chocolate cake when I was eating in a restaurant and just happened to overhear a conversation between two women in the next booth. While the lady in red was talking to the lady in blue, I was feverishly writing down the directions she was giving her for this cake so that I could go home and try it for myself. And just as the lady had promised, it was absolutely the best chocolate cake I had ever eaten. It's rich, dark, moist and full of chocolate pieces. You can make it as a Bundt cake as I've done here, or in layers. And you can frost it with rich chocolate frosting or with cream cheese frosting. Either way it's delicious. Here is how you do it:

1 Duncan Hines Devil's Food cake mix
1 Duncan Hines dark chocolate fudge brownie mix
1 package Jell-O instant devil's food pudding mix
1 12 oz. package miniature chocolate chips or regular chocolate chips chopped in a food processor

1 recipe cream cheese frosting (below)


1. Preheat the oven to 350 degrees. Prepare the Bundt pan by spraying it with Pam Baking spray. Mix the chocolate cake first according to the package directions.


2. Place the chocolate chips in food processor and chop into small pieces.

3. Add the chocolate pudding to the cake mix.

4. In a separate bowl, make the brownie mix according to package directions. When completely mixed, add to the cake mix.

5. Prepare the Bundt pan by spraying it with Pam Baking spray. Carefully pour the batter into the pan. Bake for approximately 60 minutes or until it is completely done. Test it by seeing if it springs back when you touch the top. Poking it with a pick won't give you a true test because it will always come out with chocolate on it from the melted chocolate chips.

6. Remove from the pan onto a plate and allow to cool completely before frosting.

7. While the cake is cooling, make the cream cheese frosting using the recipe below:

2 8 oz. softened packages of cream cheese
1/2 cube softened butter (1/4 cup)
2 lb. bag of powdered sugar
2-3 Tbsp. milk
1 tsp. vanilla

1. Place all the above ingredients into a large mixer bowl. Start the beater slowly and mix until all the ingredients are well blended.
2. Beat on high speed until the frosting is fluffy.
3. Frost the top and sides of the cake. If you want, you can split the cake in half and frost it as you would a layer cake.
4. Immediately place the cake in the refrigerator and keep it refrigerated until ready to serve.

This cake serves 12 to 16. It is undoubtedly the very best chocolate cake ever! Enjoy!

Thursday, August 25, 2011

NORWEGIAN HAM AND EGG BREAKFAST

RECIPES FOR WHEN THE LAST THING YOU WANT TO DO IS TO GO INTO THE KITCHEN AND COOK SOMETHING.

Actually, I have no idea whether there is a single Norwegian out there who has ever had this recipe for breakfast. The only reason I have called it 'Norwegian' is because of the cheese that is used which is called 'Jarlsberg' cheese. Here is what Wikipedia has to say about this kind of cheese:

"Jarlsberg has a yellow-wax rind and a semi-firm yellow interior. The flavor is mild, buttery, nutty and slightly sweet. It is an all-purpose cheese, used for both cooking and eating as a snack. It has a characteristic smooth, shiny-yellow body, and a creamy supple texture. Jarlsberg Special Reserve is produced in Norway in limited quantities. It is aged a minimum of one year and is distinguished by medium to large holes.

HistoryThe history of this cheese can be traced back to the middle 1850s. Anders Larsen Bakke (1815–1899) was a farmer and entrepreneur and a pioneer in Norway's dairy industry. He produced cheese in the Vale village in what was then the county of Jarlsberg and Larviks Amt, 80 km south of Oslo. The cheese shares similarities with Emmenthal, introduced to Vestfold by Swiss cheese makers during the 1830s.

[

The Jarlsberg cheese known today is a result of a long period of research and development carried out the Dairy Institute at the Agricultural University of Norway. The cheese-making process was developed by Ola Martin Ystgaard, professor of the Agricultural University of Norway. Starting in 1956, Ystgaard and some of his students eventually came up with the recipe that is used today and is secret. Commercial production of cheese began in the 1960s."

This is probably a lot more information about Jarlsberg cheese than you ever wanted to have, but it is really what makes this breakfast superlative. Jarlsberg is wonderful cheese and the thing I like about it is that it lasts a long time in the refrigerator without getting moldy. I have had some that was grated and it kept for almost 6 months and was perfectly good when I used it. That is really remarkable for any kind of cheese which makes it definitely worth the money which, by the way, is a little more than you are used to paying for ordinary cheese. Here is how it is put together:


2-4 pieces of toast
4-8 thin slices of ham
4 boiled eggs
2 cups grated Jarlsberg cheese
2 tsp. parsley

1. Make some toast and put on some grated Jarlsberg cheese.
2. Place 2-3 pieces of thinly sliced ham on the toast and cheese and sprinkle more Jarlsberg cheese on it.
3. Boil some eggs and slice them thinly and place them on top of the toast, ham and cheese.
4. Put more Jarlsberg cheese on the eggs.
5. Place in a small broiler oven to melt the cheese.
6. Sprinkle with parsley. Serve hot. Serves 2.


This is one of those recipes that you have to try it to see if you really like it. You can't go by the pictures or by what I'm telling you here.

Savvy Kitchen Tip:
Buy an extra dozen eggs when you do your weekly shopping and boil them all together to have on hand in the refrigerator for making things like potato salad, deviled eggs and, of course, Norwegian Ham and Egg Breakfast.

Wednesday, August 24, 2011

THE BEST PEANUT BUTTER APPLE DIP YOU EVER TASTED

RECIPES FOR DAYS WHEN THE LAST THING YOU WANT TO DO IS TO GO INTO THE KITCHEN AND COOK SOMETHING.
.For some reason there comes a time when you just have to have a good apple but the way to make a good apple even better is to have something to dip it into. I'm not saying that this dip is good for you; in fact, it probably would never pass a EEG test, but as long as you don't over-indulge then it's probably not going to kill you to eat it. And, the nice thing about it is that since you're eating something as healthy as and apple, you can easily justify it. As you can tell, I've had a lot of practice justifying myself when it comes to eating foods that I probably should not be eating. But if you're having a special occasion and you need something that will pass the scrutiny of your fussiest eater, including the children you have in your life, then this is something you might want to try. It just might get your non-fruit eaters to cross over and turn into apple-likers. Now wouldn't that be something? So here's how to put it together. There's no need to worry that it's beyond your capabilities because it's probably the simplest recipe that you'll find on this blog.

4-6 fresh apples
1/2 fresh lemon
1 T. sweetener
3/4 C. creamy peanut butter
1 can sweetened condensed milk

1. Wash and slice the apples. Squeeze the lemon and sprinkle over the apples. Mix well, then add the sweetener.
2. In a separate bowl, blend the peanut butter and sweetened condensed milk together. It should be thick but not too stiff.
3. Place the dip in a small bowl in the center of a serving platter. Arrange the apple slices around it and serve. See? I told you it was easy. You'll have them coming back for more and asking you what is in this wonderful stuff. Serves 4-6. Enjoy!


Tuesday, August 23, 2011

CRUNCHY AND DELICIOUS FRIED RED TOMATOES

RECIPES FOR WHEN THE LAST THING YOU WANT TO DO IS TO GO INTO THE KITCHEN AND COOK SOMETHING.

Because of the movie "Fried Green Tomatoes" all this time you have probably been thinking that if you dont' have any green tomatoes to fry, you couldn't possibly fry any tomatoes at all. Well, I'm here to tell you that this just is not true. Regular red tomatoes are absolutely delicious fried. In fact, you can fry just about anything in the vegetable kingdom and it will taste good--just ask any Southerner. Adding fried tomatoes to your dinner can turn an ordinary hum-drum dinner into something almost glamorous. It doesn't take any special skill to make these wonderful tomatoes, just a skillet, some oil and some beautiful ripe red tomatoes. Not too ripe, though. You don't want the soft, mushy kind, but the kind that are firm enough to hold up when they are heated on the skillet but still have that delicious taste that only a fresh red tomato has.
Here is how you do it:

4-6 ripe red tomatoes
1 1/2 C. seasoned bread crumbs or yellow cornmeal, whichever you prefer
1 T. dried basil
1 teasp. seasoning salt
2 T. oil or spray-on olive oil
1 C. grated Parmesan or Mozarella cheese both

1. Wash and cut the tomatoes into 1/4 inch slices.

2. Place the bread crumbs or cornmeal, basil and seasoning salt in a flat dish. Generously coat both sides of the tomatoes in the crumbs.

3. Spray or coat a griddle with the oil and fry the tomatoes over medium-high heat until they are lightly browned on both sides.

4. Sprinkle with additional basil when they are cooked then add the cheese on the top. You can serve them as-is or melt the cheese under the broiler until it is hot and bubbling. Delicious! Enjoy. Serves 4-6.


Monday, August 22, 2011

THE FUN OF BAKED POTATOES

RECIPES FOR DAYS WHEN THE LAST THING YOU WANT TO DO IS TO GO INTO THE KITCHEN AND COOK SOMETHING.

I would never say no to a baked potato, especially one that is covered with enough toppings to win a prize at the county fair. The wonderful thing about baked potatoes is that you just can't ruin them unless you put them in the oven without remembering to poke them with a sharp knife or fork and they explode on the inside of your oven and make the biggest mess you ever saw. Because baked potatoes are so bland, they will welcome almost any topping that gives them a little more flavor and a lot more personality than they were blessed with. Because an ordinary baked potato is not exactly exciting to look at, wrapping it up in aluminum foil makes it look a lot better than the plain old brown potato it would otherwise be. Dressing it up thus is only the first step. Beyond that, you are only limited by your imagination or what you happen to have on hand. Here is how you turn a simple baked potato into a full meal:

4-8 baked potatoes depending on how many people you plan to feed
1 onion, sliced thinly
1/2 lb. fresh mushrooms
1 T. oil
salt and pepper to taste
1 small package frozen peas
2 C. shredded cheddar cheese
1 C. sour cream
1 T. chives
1 lb. hamburger
2 T. flour
2 C. milk
1 tsp. Kitchen Bouquet
5-6 hot dogs
1 small onion, sliced
1/2 green bell pepper

1. Wash, poke and cover potatoes in foil. Bake in the middle rack of the oven at 350 degrees for one hour or until they feel soft when you touch them. Meanwhile, while the potatoes are baking, prepare the toppings.
2. Saute the mushrooms and onions in a skillet. Season to taste and set aside.
3. Cook the hamburger. Drain, then add the flour and stir to blend. Gradually add the milk and continue stirring over medium heat until it thickens. Add the Kitchen Bouquet which gives turns it brown. Season to taste.
4. Cut up the hot dots and fry in a skillet along with the onion and green pepper. Cook until the onion is soft and slightly browned and the hot dogs are well cooked.
5. Put all the toppings in separate bowls, including the cheese and sour cream. Serve with any other condiments you might like such as ketchup or butter. This is one of the easiest ways to come up with a dinner on the spur of the moment that makes it look like you've been in the kitchen for hours. If you are new to the kitchen scene or you just don't feel like cooking something, you can substitute a can of heated undiluted Vegetable Beef Soup for the hamburger and the hot dogs. It's not as good, but it serves the purpose. Also, you can be just as creative as you have the time for or feel like being. The main thing is to have a variety of toppings that are well-liked and taste good by themselves without the baked potato. That way you know it's all going to blend well together. It's amazing how filling and satisfying this is. I think one of the reasons is that everyone likes having a choice and not just one dish that doesn't give any other options. Putting all of the toppings in little bowls is like saying, "Take your pick. You can have one or all or none. It's up to you." Serves 4-6. Enjoy!

One more thing:
It's always a good idea to bake more potatoes than you actually need. Baked potatoes are great to have on hand and you can use them for so many different things, especially if you like to fry them for breakfast along with bacon and eggs. But if you have leftover potatoes and toppings from this meal, save them and you can make another meal out of them. Simply grate the extra baked potatoes into a pie dish. Salt and pepper them and flatten them out on the bottom and sides, then add the meat, peas, onions, mushrooms and cheese. Bake in a 350 degree oven long enough to heat everything through and melt the cheese. Top with the sour cream and there you go! Not a bad idea, is it?

Friday, August 19, 2011

PEANUT-BUTTER CHOCOLATE KISSES COOKIES

RECIPES THAT TAKE YOU OUT OF YOUR ORDINARY LITTLE WORLD AND GIVE YOU A NEW AND DIFFERENT EATING EXPERIENCE.


2 Cups Bisquick

2 tsp. vanilla

¾ C. peanut butter

1 can sweetened condensed milk

Granulated sugar for coating

1 bag Hershey’s Kisses

1. In a large bowl, mix all of the ingredients except the sugar for coating and the kisses.

2. Mix all by hand to form dough.

3. Make small balls of dough and roll in the sugar. Place these rolls on the cooking sheet and bake at 350 degrees for 5-6 minutes. These cookies should not be dark brown.

4. Remove cookies from oven and wait for two minutes. Place a Hershey’s kiss on top of each cookie. Then allow them to cool.

5. After cooling, store cookies in an airtight container.


I know this looks like a lot of horrible glop, but it's just all the ingredients before they have been mixed together. This recipe is easy enough for a child to do it or at least help you do it. Not having to measure all the baking powder, salt and soda, etc. makes it a lot easier, too.

The dough will be very stiff which it needs to be to make balls with it.

You won't use all the Hershey's kisses in the bag, but I'm guessing you won't have any trouble figuring out what to do with the ones that are left.

Here is the bowl of sugar for rolling the balls of cookie dough in.

Here they are on the cookie sheet waiting to be baked.

Voila! Fresh-baked cookies that are soft, rich and yummy. Enjoy!